Showing posts with label tutorial. Show all posts

Thursday, February 13, 2014

Make this! DIY bow scarf.

Listen up! Because I spent 34 years living in the desert Southwest (Arizona) I had NO IDEA that scarves were anything other than a sometimes sweet fashion accessory. But NOW? Living in the Midwest, I KNOW they are a ABSOLUTE cold weather necessity. Since moving here, my girls and I have become obsessed with finding the holy grail of scarves that does its job to perfection AND looks super cute, to boot. I'm not entirely POSITIVE that this prototype right here is the HOLY GRAIL OF SCARVES because I am merely a beginner scarf wear-er, but I contend that the style is pretty darn good at keeping you warm AND I love bows more than I care to admit (as a grown-ass woman.) Plus, this scarf is SUPER cheap and SUPER easy to make. Its like the scarf-trifecta!

To make one scarf you will need:
  • a women's sweater - long sleeved, medium weight sweater, sized medium or larger
  • 1/4 yard - 60" wide velour or cotton knit fabric (you can use anything that has some stretch)
  • common sewing supplies: scissors, ruler, straight pins, sewing machine, thread, marking pen, etc


I purchased these sweaters at a thrift store ($2.49 each!) which is OBVIOUSLY a great place to get sweaters that you are going to cut up :) Look for bright or unusual prints and stick to the more tightly woven knits - that will make it SO MUCH easier to cut into the sweater without the entire thing unraveling. Also, make sure the sweater isn't ITCHY! It is going to be up against your neck. Also, keep in mind the color of your everyday coat - my coat is black felt so I tend to wear scarves that are more brightly colored. But if you have a purple or red coat? Maybe stick to a neutral color, you wild woman, you!


First, you are going to hack up your sweater: Cut the arms off, along the black line as shown. If you are working with a cardigan, cut off the band. If you are working with a pull-over sweater, after you cut the arms off, carefully cut up the middle of front.


You should end up with something like this - a beautiful sweater vest shape. Don't worry- this is not some diabolical plan to trick you into wearing a sweater vest! This is only a temporary situation.


Next, cut open the shoulder hems. Then, turn the mangled sweater inside out, line up the bottom hem and pin the arm holes closed. You are working to achieve a rectangular piece of knitted fabric. Sew the armholes closed, while maintaining a straight line from bottom hem to shoulder. You may have to sew down each side, in its entirety. Then, trim any excess.


You should hopefully have a piece that looks something like this. Isn't this pattern amazing?


Now, trim your piece down to approximately 20"x30", making sure to keep the seams on each side as even as possible by trimming off of both sides. (you should size down for kid sizes.) Now, fold your rectangle in half, right sides together. Pin and sew a straight stitch, leaving a 4 inch gap open in the middle.


Now, you will create the bow ends. Take your piece of stretch fabric and , with right sides together, round off each end, as shown. Pin and sew. There is no need to leave an opening. Once the entire piece has been sewn, fold and cut in half at the middle. Turn bow ends right side out.


Next, adjust the placement of the seam on the sweater piece so that it is in the middle-back, as shown. With it still turned inside out, place each of the bow ends inside the sweater tube, as shown, and pin in the middle along both ends. (There is no need to leave the tails out, as shown, that was done to further illustrate the step.) Sew along each end. Turn the whole thing right side out through the opening. Finally, either whip stitch or machine stitch the opening closed.

I wish I could say that I think that scarf weather is almost over..... but yeah, no. Its 8 degrees as I sit here, typing this. At 2:20 p.m. Today's high was somewhere around, ummm, 8. That's without the windchill, my friend. So, viva la scarf!

I've made about 6 of these so far, with no end in site. (PSST - if you crochet or knit, you can whip up a tube out of thick yarn if used apparel freaks you out. And then just sew in the velour bow ends. You wouldn't need to worry about raw edges so just stick the right-side-out bow ties in the ends and top stitch in place. I made my girls some of that variety for Christmas. Not to say that much skeeves me out. I am pretty much low skeeve.)

(mad props to my youngest for braving the elements ( NEGATIVE 11 DEGREES) to model for her crazy mom.) 
But seriously. Doesn't her neck look WARM? :)


Tuesday, February 11, 2014

Hot glue or fabric? Not this week! Let's have fun with SCIENCE.

I was assigned some science-y themed articles a couple of weeks ago for SheKnows.com and was up to my EARS in experimenting and researching and BEGGING my 16 year old son for help. It was actually really fun. Do you have a kid that needs some science fair ideas? Well, this might be YOUR LUCKY DAY.

Have you ever wondered how antacids work? Also, learn how to make a simple universal indicator using red cabbage RIGHT HERE.


Ever thought about making your own crystals? (NOT THE ILLEGAL KIND, MOM.)
Just salt and water and food coloring and a cup. Learn exactly how (and why) it works RIGHT HERE.


What's that, you say? You've always been mesmerized by the wonder of a hovercraft? ME TOO! Check out the (basic) mechanics and a kick-ass poster idea RIGHT HERE.


And HONESTLY my fav of the bunch was this idea for a Student Council election poster. This project right here made my oldest daughter want to run for student council president :) Show your children WITH CAUTION if you don't want a politician in the family! Get the deets to make one just like it RIGHT HERE.

Are you EXCITED for science fair season or DREADING it? Me? I am that mom that seriously lets their kids do LITERALLY ALL of their own project work, solo, no matter how much crooked letters or smudges or less than perfection bugs the crap out of me. So my kids projects look like.... KIDS DID THEM. Crooked and sometimes messy. But NO STRESS and my kids learn ALL. THE. THINGS. I repeat to them, frequently, I ALREADY PASSED (insert applicable number) GRADE. At this point, they know: I am a mean mom. Are YOU a mean mom? We should start a club or something.


Saturday, August 27, 2011

{make this!} The yo-yo headband that you ALMOST forgot about :)


Hi friends!  When I became a total star ... started on my quest for craft world domination ... made my television debut last week, this headband was one of the two YO-yo-yo projects I intended to talk about making. And then we took so long talking about the tank top and, well, actually just MAKING a yo-yo, I never actually got to this one. I am quite certain there might be one person out there that is interested in this, so One Person? This is just for YOU :)
completed_headband_02

The headband is pretty simple, just a collection of yo-yos on a felt base. 

To make one of these little suckers, you'll need:

-A plastic headband - I bought a pack of 5 at the dollar store, for, well, A DOLLAR :)
stack_of_fabric 


-square fabric scraps or a charm pack - stack them up in rainbow color, because that's just really more pretty to look at :)
yoyomakers

-yo-yo makers in various shaped and sizes {or an old trashed cd to trace if you don't have a yo-yo maker} 
red_yoyos

-a handful of buttons or flowers or stacked felt flowers {I will show you at the end how to make a simple one} and at least 8 finished yo-yo's.

headband_felt

A piece of white {or any coordinating color} craft felt, cut into a bean shape, approximately 4 inches long.
headband_tutorial

To start, make your yo-yos. Don't have a yo-yo maker? Go here. Now, glue the felt piece to the underside of the headband, starting where ever you'd like your patch of yo-yos to be. I did these off to one side {and since there is no front or back? It can be worn to either side}.
yoyo_headband_tutorial_01

Start building your patch by first covering your headband with three large yo-yos. Securely glue the yo-yos to the felt as well as the headband. Then just glue the rest, overlapping, over the rest of the white felt, covering the felt as much as possible. Trim away any edges that aren't covered.

stacked_felt_flower

To make a quick beaded and stacked felt flower:


  1.  Cut a small, bigger and biggest circle out of felt. {smallest is about the size of a penny}
  2. Glue and stack together. Once all glued together, put a generous ball of hot glue on the top in the center
  3. Carefully push the glue spot into a pile of small seed beads {while the glue is still HOT}
  4.  Let the glue dry and then flick off any loose beads

completed_headband


Friday, August 19, 2011

Its true, they let me on LIVE tv - How I spent 4 minutes focusing on not F-bombing it.

{my television debut}

....

In case you don't follow me on twitter, I was on this local show yesterday doing a craft demo. It's true. Me. Tv. Live. Insanity. Big hair, hambone arms, double chin and all. Here's the low-down. I was worried about f-bombing it or a nip slip THE. ENTIRE. TIME. Its truly absurd since I can actually be out in public and not riddle my conversations with vulgarity. {shut-up, Heather.} I have NEVER just casually shown anyone my nipple. Really. For REAL. I can be trusted {most of the time} in polite society and not embarrass anyone. But for some reason? I thought surely all hell was going to break loose when these people let ME of all people on LIVE tv. Oh, man. But, besides that? I wasn't nervous at all. In fact, I was on my BEST BEHAVIOR and apparently not as sassy as everyone expected! 

...

I will do better, next time.... which just so happens to be next Thursday, August 25th when I am going to appear on Sonoran Living.... If you are in Arizona, please tune in if you can :)


Sunday, July 10, 2011

Keeping me busy.

I recently had the opportunity to do several fun crafting tutorials for sheknows.com

If you get a chance, go check 'em out :)


4 easy ways to embellish a plain tank top:
http://www.sheknows.com/living/articles/835499/4-easy-ways-to-embellish-a-plain-tank-top

How to sew a new bloomin' pillow slipcover (SO EASY!)


How to DIY a pet ID tag

http://www.sheknows.com/living/articles/835471/how-to-make-a-pet-id-tag


Upcycle an old sweater into a DOG SWEATER!

http://www.sheknows.com/living/articles/835477/sewing-a-dog-sweater


DIY a pet leash
http://www.sheknows.com/living/articles/835475/how-to-make-a-creative-dog-leash


Yep  - it's a litterbox cover. LOL

http://www.sheknows.com/living/articles/835473/how-to-make-a-litter-box-cover


How to make personalized pillow cases
http://www.sheknows.com/living/articles/835489/how-to-make-personalized-pillowcases-for-kids


Make an initial bookbag
http://www.sheknows.com/living/articles/835491/how-to-sew-a-simple-bookbag


Make a scrapbooking supply carry-all
http://www.sheknows.com/living/articles/835479/how-to-make-a-chic-scrapbooking-bag

I am DYING over our little terrier, Chuy, in that sweater! It was about 110 the day we had that photo shoot and he HANDLED IT LIKE A CHAMP! And for the record? He was agreeable to sitting on my ironing board for that particular shot. What my kids could learn from him.... :)

Friday, May 20, 2011

{make this!} A composition book cover + FREEBIE FRIDAY!

It all started with this notebook I made for Creative Estates:


And then I {we} were HOOKED.....
notebooks

So, remember long ago, when I posted pics of these fun composition notebooks I had made for my friend Erin? And how I had said I had a SUPER QUICK and SUPER EASY tutorial I was going to post? And then everyone quickly realized I was a BIG FAT LIAR? Well, who's the liar now, weenies? Because HERE IT IS, in all of it's 18 picture tutorial glory {14 of said pics are almost assuredly unnecessary}. Better late than never, friends. Better late, than never.

This project is rated SUPER EASY. How easy, you ask? Even when you are having a day where you feel like you are crafting worse than a drunk monkey? You will STILL find success with this project. I swear.{you can trust me.}
notebook16
Supplies are super simple. Plug in your sewing machine and make sure that bobbin has thread on it. Plug in the ol' glue gun {if you aren't ashamed to laze it out}but if you are all proper and stuff, I will show you how to sew at my gluing point.... Gather some fabric together- {THIS MIGHT BE JUST THAT EXCUSE YOU WERE LOOKING FOR TO GO TO THE FABRIC STORE. OR? Shop online! Did you know you can order fabric at Amazon? OH FRIENDS! That means with Amazon Prime, you can get free shipping on fabric all. day. long. Its almost sinful NOT to be ordering fabric all day long, isn't it????} At least one piece needs to measure 12" x 22". You might even get a little crazy and patchwork together a few scraps to get something this size. Woot woot! You will also need an 18" piece of  pretty  elastic or stretch lace to serve as the closure.

You also need {duh} one regular composition book, like this one:
target-composition book
{these are around a dollar at Target}
notebook11
An optional supply for this project is something I keep in my sewing arsenal ALWAYS! Wash away Wonder Tape is my best friend in the sewing room. {well, besides spray adhesive}I HATE HATE HATE HATE HATE to use straight pins. HATE! I REALLY prefer to just use this to tape pockets down - well, really anything that can be taped down- and then stitch. This will NOT gum up your needle and if you ever wash your cover? This stuff dissolves in water. GENIUS! {I buy this at Joann's, either with a coupon or when the notions wall is 50% off.}
notebook15
Ok. We are ready to get started. Cut out a piece of fabric {or create one with patchworking} that measures 12" x 22". Try not to cut it so that your HB Pineapple motif is going to be on the front upside-down. But if this happens? Meh. Move on. There are bigger things to worry about and Erin is such a nice friend, she will never say anything :) I serged around the edges, mainly because I own a serger {or two} and I like to serge whenever possible. There aren't really going to be exposed edges, so if you don't have a serger, skip this part. Geez. How many times have I said serge? SO MANY TIMES the word looks weird to me now. Serger. Serge. Serge. Serger. OK, moving along...
notebook14
Now, fold over 3" from each side and press, right sides together, along the fold.
notebook13
Press, press, press. Press HARD. Iron like you MEAN IT. {Truthful moment: I cropped out the duct tape repair on my iron. And my really beefy arm.}
notebook12
Now, unfold and your crease serves as the no-man's land for decorating the front of your cover. As in, don't go too near the crease and anything to the right of the crease? That is going to be on the inside of your notebook. {I didn't take a pic, but you also need to fold the entire piece in half, like a book, and press a crease there, too. That will serve as your binding mark. Anything to the left of that crease will be the back cover.}
notebook10
Now, embellish to your hearts content. I taped on and then stitched a pen/pencil/marker pocket, added Erin's business initials and a bird patch I made from fabric + Heat N Bond LITE.


{did you know EVERYTHING IS BETTER when you put a bird on it????}
notebook09
This is what my cover looked like after i was done embellishing the front. If I could do anything over? I would move the pocket down and the bird over...... the bird was painfully close to my elastic closure and it annoys me.... or I could just be hormonal. At this point? Its ANYONE's guess. {husband? Best for everyone if you refrain from guessing....}
notebook08
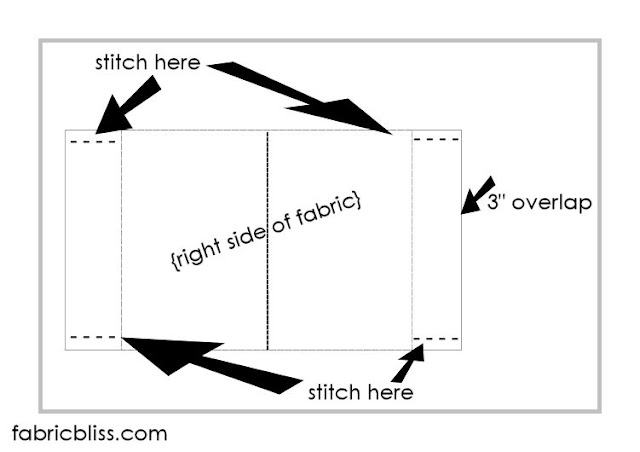
Now. Take your cover back to the ironing board and touch up those creases. Now, sew along the tops and bottoms of both front and back seams {using a 1" seam} just where the fabric is overlapping. {does that make sense?}
In what is perhaps one of the lamest little layouts that has ever been made, LOOKIE I made a little pattern because I think I am complicating this WAY. TOO. MUCH!
notebook07
Now, when you take your little beauty back to the ironing board and flip everything right side out, it should look something like this ^ Press down those flaps on the tops and bottoms and stitch those down too. Just where they are flapping up. Don't stitch over where your book is going to go into your cover, you dig me?
notebook06
Now, convince your composition book into its new cover. Depending on how straight you sew and cut {i don't cut or sew straight hardly at all - wonky in da' house}this could be super easy (or) REALLY DIFFICULT. But. I KNOW you are going to get her in there!
notebook05
Now. Here is where I am going to glue. This part can be accomplished WITH THE COVER ON with glue, but if you are stitching, it needs to be done before you put your cover on. {ahem. overachiever.}Make a loop with your 18" piece of lace or elastic, and glue the ends together. Take said loop and position on the back cover, near the edge that is NOT the binding, go somewhere in the middle and glue it like you mean it. {if you are stitching, re-read that last part but substitute the word GLUE with the word SEW. Be careful not to stitch through the back to the flap where your book cover goes.}{for the record- us glue-ers don't have such worries.....}
notebook03
I like to cover my glue shame handiwork with a little heart cut from fabric. Just glue that little sucker right on top.
notebook02
Voila! And just like that, you are finished.
notebook01
Now that you are such a notebook cover making pro, I encourage you to try different fabrics and trims. MY FAV I have made so far is this ruffle confection! Erin is lucky I mailed it when I did. I had several little ladies in this house eye-ing it up.....

Hey, GUESS WHAT? I am going to giveaway one of these little pretties to one lucky commenter. Love this? Hate this? Having a bad hair day? Does your husband work from home as well and you are having one of those 'wanna poke his eyes out' kinda Friday's, too? Tell me about it right here in the comments and Sunday night, I will pick a winner. {did anyone else's family say 'pick a winner' in reference to picking one's nose? or was that just my weird kin???} 

{I'd love to see pictures if anyone makes one of these}